The Case Of The Bulging Tire

When my old tires started showing signs of serious wear, it was time for a change. However, I learned a valuable lesson in going for the cheaper option.

I have a thing for Continental tires.

Back in my teens it was their MTB tires. The round profile was a nice break from the ultra-knobbly tires and made cornering on dirt a firm dirt a pleasure.

And when it was time to get on the road, Continental 26 inch slicks were where we all turned.

continental-sport-contact.jpg
Continental Sport Contact

But times, they changed.

The bike shop that was closest to me in Taipei were unable to source Continental tires easily.

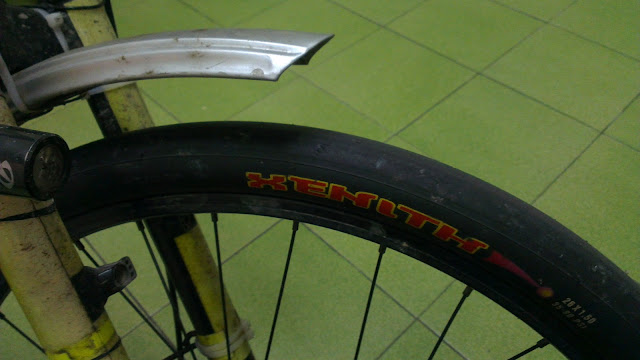
The owner recommended that I just get the Maxxis Xenith that they had in stock.

Very warily I took ownership of a set of tires from a manufacturer of tires I’d never used before.
IMAG0827.jpg
Maxxis Xenith 26 x 1.5 Slicks

The tires, they took a beating, have done over 10,000km to date and are still doing well for themselves after many hours on the road.

However, as time goes on, they are starting to show their age.

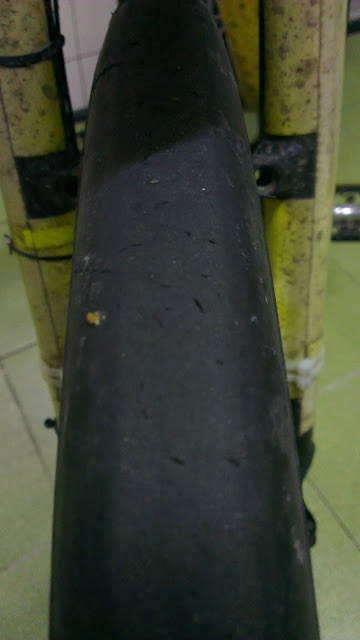
I was slightly concerned by the many little holes and nicks that had developed on the tires.
IMAG0829.jpg
Well-Used Kenda Xenith

Although I tend to ride stuff until it breaks, my venturing into the world of long rides made me a little more conscious of my gear.

So I got a pair of Kenda Kwest from the local bike shop, because that is what they had, and the price was good.

The rubber is a good deal thicker and they are semi-slicks and looked okay. The price was also decent.

So I took the plunge.

And things were peachy… for a while… until.

BLOOOOOOOOOOP!

Bulging… huh?

One section of the rear tire just got huge and looked like it was going to burst. But didn’t burst. I actually rode it for a few more days and it remained the same size. It was like I was riding with a rock attached to my wheel… bump… bump… bump.

“Well, damn. Must have been something I rode over that caused this.”

So I let out all the air, removed the nasty tire and got to inspecting the situation.

Nothing.

Refitted tire with different tube. Who knows, maybe one of the sections of the tube with 5 patches was causing some funkiness. But alas, the same thing happened again.

So the old Maxxis (I never throw anything away) got a place on the rear wheel. No problems.

I continued happily riding for at least another thousand kilometers until one day…

BWOOOOOOP!

Another ballooning, this time in the front wheel.

So I made like Sherlock and went hunting for the source of this vexation.

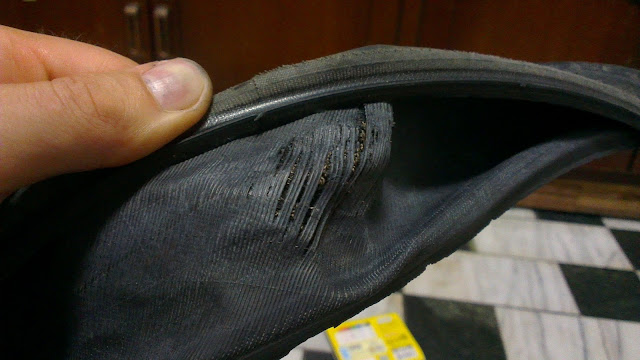
And after some digging I found the culprit.
IMAG0733.jpg
Damaged Casing

This was the enemy.

It was the tire itself that was to blame and all along I was trying in vane to defend it like a misbehaving family member. I honestly thought it was something to do with the tubes.

Evilness!

What prompted me to take a closer look at this part of the tire, and helped me actually come to the conclusion that this was the issue was a closer look at the outer casing from the outside.

Running my fingers around the whole tire pressing the outer layer, this section felt too soft and pliable.
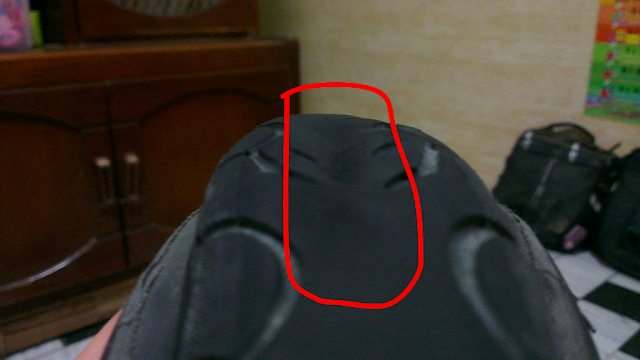
Image905926045.png
That Should Not Cave Inwards

Voila!

This soft section is what let this portion of the tire start ballooning.

Checking my other Kenda tire revealed the same issue.

I am now riding on my worn down Maxxis Xeniths again. And they are great.

I’ll wait until they are truly unusable this time.

kenda-kwest.jpg
BOOOOO to Kenda

Why does this all bother me so?

Because there is not much reason for a tire to be changed until it wears out. Yes, premature damage happens. But if you’re not doing stuff like this, then it shouldn’t.

The Copenhagen Wheel

http://picasaweb.google.com/hellotopeter/Beyond1200#5510970799316672322

The Copenhagen Wheel is touted as bringing the web, online social media, green power and cycling together.

The wheel itself feels like cool technology for technologies sake, and I don’t mind that. Efforts to do new things inspire others to do new things and that all works together in the end.

All it needs now is to include a Rohloff hub and you’ll have an ridiculously expensive wheel that does a whole lot of cool things. And it will bring your bike one step closer to being the electronic beast that most cars have become.

I have to give it credit for being a super-simple way to add electric power to any bike.

Here’s a video about it:

This was from an article at The Guardian.

Shimano MTB Cycling Shoes Review Update

The original review is at Shimano MTB Cycling Shoes Review but I took new pics with a better camera, so here is an update.

http://picasaweb.google.com/hellotopeter/Beyond1200#5510940003743186482

Faithfully serving me for over a decade, this pair of shoes don’t disappoint. Being my fourth pair of cycling shoes they have lasted a helluva lot longer than any other shoes I have owned.

The typical minimal design and comfortable shape all make the shoes almost unnoticeable after I put them on and start riding. Seeing as I already did a overview of the shoes before, lets look at how they have held up specifically.

From the picture above, the areas of wear and tear are quite clear, but I’ll identify them more clearly here.

The leather has held up through all these years. It is has dried out and I have never applied anything to make the leather stronger or put back the shine. The original glossy red is no longer there, but still, bright red shoes don’t need to be shiny to be noticed.

The sole and the body started to separate a few months ago, as can be seen where the nose piece attaches to the main body. I outline how to repair shimano cycling shoes previously. After a bit of patching they are now ready to go.

With good fit, there is less necessity to have tight straps. Like the fit of a good helmet, the shoes should stay on even without being strapped in. This is true with this pair and the two straps serve as the final bond to keep your shoes and feet together. The straps combine a plastic strap part with velcro. The plastic and velcro are almost completely separated, so it seems the plastic part was superfluous and probably just there for branding purposes. The velcro still holds strong and will probably be strong enough to last for a few more years.

http://picasaweb.google.com/hellotopeter/Beyond1200#5510940111682878386

The bottom of the shoes shows the deterioration of the rubber. Seeing as I don’t walk around in these shoes much the rubber has just worn out with time, rather than from heavy use.

The wear patterns do show the most contacted points of the sole. The area around the cleat is worn out because it takes a bit of beating when the engaging and disengaging the pedal. The nose of the shoe also takes a slightly harder beating when walking.

The hardened rubber no longer provides great levels of grip when walking on slippery surfaces and I need to watch out when walking on smooth, wet floors, but then again I need to be careful when I do that with all my ordinary shoes too.

http://picasaweb.google.com/hellotopeter/Beyond1200#5510940891451020194

A closeup of the rubber near the cleat.

http://picasaweb.google.com/hellotopeter/Beyond1200#5510940791701511106

The sole of the shoe has been strong and dependable.

As I haven’t bought any new shoes in such a long time I’m not clear if modern shoes experience the same problems as all my original shoes did.

At the time I bought my first set of Shimano shoes (not this pair) many of my friends had problems with the soles of their shoes cracking or breaking.

The sole of those original Shimano shoes cracked right across, just behind where the cleat was mounted. Friends were quick to tell me that it was because I did crazy things on my bike or that I was heavy, but that’s just rubbish and as these shoes have shown, those original problems were in the design.

This pair are as strong and dependable as before, although now a little tired looking, much like the dude who puts them on every now and again.